Saturday 19 December 2009

Panduan Cara Membuat Website Dan Upload Ke Hosting Telah Diluncurkan!

Apa yang sangat penting dalam menjalankan Bisnis Online?

Keahlian apa yang sangat vital bagi kesuksesan kita di Internet?

Saya tuliskan 4 hal penting di Internet:

1. Produk.
2. Website.
3. Kunjungan/Traffic.
4. Otomatisasi.

Tanpa produk, kita masih bisa menjual produk/jasa orang lain.

Tanpa website, anda bahkan tidak bisa melakukan apapun.

Untuk mempromosikan produk sendiri kita perlu website.

Mempromosikan produk orang lain, terbaik bila melalui website kita sendiri.

Blog saja belum cukup, untuk jangka panjang kita perlu mempunyai website sendiri.

Apalagi jika berbicara membuat website penjualan. Website yang profesional. Website yang sederhana. Namun dipenuhi dengan kalimat penjualan yang mendorong orang untuk membeli.

Kunjungan saja, bukan apa-apa tanpa website.

Tidak heran, industri website adalah Industri Trilyunan dollar di dunia.

Saya baru saja meluncurkan “Panduan cara membuat website Dan Upload Ke Hosting“

Friday 4 December 2009

2010 Laptop Roadmaps for AMD and Intel

In my last post, I talked about desktop roadmaps for AMD and Intel; this time I'd like to look at the mobile roadmaps. 2010 is shaping up to be an interesting year for laptop computers, but in some ways, it's just a stopgap until even bigger changes come the following year.

On the processor front, the big news will probably come early next year, when Intel will introduce its "Arrandale" chip, the mobile version of the dual core 32nm Westmere line. This chip will have two cores, but with support for hyperthreading, it will support four threads. This is part of the company's "Calpella" platform (based on its 5-series chipset). Arrandale may come out under different brand names (Core i3, Core i5, and Core i7), with the differentiation due to support for turbo boost and the amount of cache available on each chip.

One big change with this chip is that it will include both a 32nm processor die and a 45nm graphics die on the same chip, as Intel integrates more features. Since the bulk of laptops use integrated graphics, it will be very interesting to see how this performs compared with AMD's existing integrated graphics, which have typically been faster than Intel's equivalent.

Intel Client Roadmap.jpg

(Click on all images to enlarge)

On the higher end, the company recently introduced the quad-core (eight-thread) "Clarksfield" chip, which is sold under the Core i7 brand. It is also part of the "Calpella" platform.

You will probably still see a number of Core 2 Duo notebooks (based on the older "Santa Rosa" and "Montevina" platforms) on the market for some time, as well as machines using the Pentium and Celeron brand, which are mostly older designs with less cache, and sometimes a single core instead of two. Within this group, some processors are marked as "ultra-low voltage," which means they generally use less energy and so have slower clock speeds but better battery life. The bulk of this line has recently moved from single-core to dual-core processors, and it's likely we'll see the "Arrandale" chips move into this segment later in the year.


And of course, Atom will be the entry for netbooks, which has become a very large part of the market. Intel is planning on replacing its existing "Diamondville" version of Atom with a new processor called "Pineview" (on a platform it calls "PineTrail") early next year.

Intel Netbook Roadmap.jpg

Within AMD's line, the big change will be the introduction of quad-core mobile processors and a new integrated graphics chipset that is DirectX 10.1-capable as part of its "Danube" platform, due out in the first half of 2010. The 45nm processor, which should be available in both dual- and quad-core versions, carries the code name "Champlain" but will likely get an official name in the Turion family. AMD is downplaying processor names in favor of its "Vision" platform (with Vision on the low end, Vision Premium for higher-end integrated graphics; and Vision Ultimate for machines with discrete graphics). AMD plans a version of its Direct X 11 discrete graphics for this market as well, which could be a very strong platform for gamers and others who need that level of graphics.

AMD Notebook Roadmap.jpg

AMD is also planning a new version of its products for the "ultrathin" market in the first half of 2010, with a dual-core 45nm chip known as "Geneva." This will be part of the company's "Nile" platform and is aimed between the netbook segment and mainstream notebooks, with better battery life than a traditional notebook but more performance than a typical netbook (including a discrete graphics option, which seems unusual in this category).

AMD Ultrathin Notebook.jpg

All these products are interesting, but 2011 is when the architecture really changes, with processor cores and graphics cores coming together to form a single die from both companies. AMD has talked more about its strategy, planning for a platform called "Sabine" with a new quad-core "accelerated processing unit" codenamed "Llano" for mainstream notebooks; and a platform called "Brazos" with a new APU, "Ontario," that uses a new core called "Bobcat," designed for lower performance and longer battery life. Intel, too, is talking about combining graphics and processing on a single 32nm die in that time frame, but it hasn't shared many details yet.

I'm not sure yet whether a typical user will particularly care whether integrated graphics are on a chipset (as in most of today's mainstream notebooks); bundled with the CPU die into a single chip, as in Intel's Arrandale platform; or actually placed into a single die with the CPU, as both AMD and Intel plan for 2011. What matters is performance and reliability. Gamers and others who need high-end graphics will continue to choose discrete graphics, but the hope is that tighter integration will yield to better performance for video playback; light-duty video editing and encoding; web browsing; and light-to-medium-duty gaming. Of course, the proof will be in the platforms, and I'll be looking to see these.

Next up, server platforms.

2010 Server Roadmaps for AMD and Intel

In my last two posts, I looked at the desktop roadmaps and the notebook roadmaps from AMD and Intel, so now it's time to look at the company's plans for the server market. In some ways, this is most interesting roadmap, because a lot of new technology enters the market through server chips. 2010 promises to see some big changes.

In general, 2009 was not a great year for server sales, because global economic issues hurt enterprise IT spending across the board, and because more widespread adoption of features like virtualization meant that some organizations found they needed fewer physical servers. But there were some important technology changes: notably, Intel's introduction of an integrated memory controller and QuickPath Interconnect, which increased the memory bandwidth among multiple processors (something AMD has had for a while with HyperTransport) and the introduction of six-core processors from both vendors.

The server market divides up into a number of different categories, ranging from machines that are really more like desktops with a single processor, to today's mainstream of dual-processor capable machines, to multi-processor machines that can typically handle four or (with special chipsets) more processors. In addition, dual-processor-capable server chips are also often used in high-end workstations.

AMD has the same basic processor technology in all these fields, with its Opteron 1000 series, aimed at single-processor servers; Opteron 2000 series, aimed at one- and two-processor servers; and Opteron 8000 series, typically aimed at four- and eight-way servers. All are mostly covered by quad-core versions known as "Shanghai" and six-core versions known as "Istanbul." Both are 45nm processors and support HyperTransport, with the higher-end versions supporting HyperTransport 3 with a claimed maximum throughput of 57.6 GB/s.

In 2010, AMD plans on focusing on two new series. The 4000 series will focus on single and dual-socket servers, with a platform called "San Marino." This will have a new series of processors (but based on the existing processor core technology) known as "Lisbon," which is slated to come in both four- and six-core versions, and which will use two channels of memory. This platform is said to be optimized for high-energy efficiency, with some versions in which the cores should be using less than 6 watts each. It is slated to be out in the first half of next year.

The 6000 series will be aimed at two- and four-socket systems, with support for four channels of memory as part of a platform called "Maranello." This will feature 8 and 12-core processors, known as "Magny-Cours," which are essentially two die of the "Lisbon" processors.

AMD Server Roadmap.jpg

(Click to enlarge all images)


This will be followed in 2011 with new processors based on the company's upcoming "Bulldozer" core, but with the platforms mostly staying the same. That year, the Opteron 4000 should get the "Valencia" 6- and 8-core processors, with the 6000 series getting the "Interlagos" 12- and 16-core processors.

Intel has a more diverse line of server processor families, with three lines of Xeon processors based on the x86 architecture that is standard in desktop and mobile chips. It also has the Itanium family, which is designed for larger "mission-critical" servers (and where it primarily competes with servers with other architectures, such as IBM's Power series and Sparc processors from Sun and Fujitsu.)

Of course, most of the volume is in the Xeon family. That starts out with the Xeon 3000 series, which is aimed at single-processor systems, and thus runs similar chips to those used in desktops. This is currently represented by the "Foxhollow" platform, and features the "Lynnfield" processor, a 45nm chip with 4 cores (also used in the Core i5). In 2010, the company plans to add a 32nm "Clarkdale" processor to this platform; as on the desktop side, that is a dual-core chip with hyperthreading, so it supports up to four threads. In addition, Intel has talked about making new lower-power versions of the Xeon 3000 series in early 2010.

The big push this year has been in the Xeon 5500 series, typically used in dual-socket servers in a platform known as "Tylersburg." These chips, known as "Nehalem-EP" are 45nm processors with four cores and eight threads, as well as support for the QPI interconnect. It's been particularly well received.

In 2010, the platform is slated to stay the same, but with a new 32nm version quad-core chip code-named "Westmere-EP." Intel has said this will have some new features including Intel Trusted Execution Technology, designed to make the system more secure, and AES acceleration, designed to protect the data.

Intel Server Roadmap.jpg

For larger servers, Intel's Xeon 7000 series has been represented by the "Caneland" platform with a six-core 45nm chip known as "Dunnington" and an older 45nm quad-core design. These chips can be used in dual-socket servers, but are primarily designed for systems with four or eight sockets. This is slated to be joined shortly by a chip known as "Nehalem-EX," with eight cores and 16 threads. This will have four high-bandwidth links using the QuickPath architecture, and what Intel says is up to 9 times the memory bandwidth.

This is part of a new platform called "Boxboro," which will also eventually be used for a 32nm version of the chip known as "Westmere-EX." Typically, Intel rolls out the single- and dual-socket server products early in a design transition, with the multi-socket version coming later.

On the Itanium side, Intel also plans to move that to the Boxboro platform in the first half of 2010, with a new processor called the Itanium 9100 or "Tukwila." This will be a big change for Itantium adding things like DDR3 and QPI support. The roadmap there has two more chips slated for future years, called "Poulson" and "Kittson," but there aren't many details of those available yet.

Apple Tablet Prediction Is a 'No Brainer'

Research firm IDC has published an overview of its predictions for 2010, one of what the company promises will be the first of dozens of similar documents over the next few weeks.

The first top ten predictions deal with generally macroscopic predictions; for example, the first is a belief that that the IT industry will return to growth, increasing 3.2 percent to worldwide spending levels of about $1.5 trillion. (Marketing budgets, the foundation of Internet advertising, are expected to increase by 3 percent after falling 8 percent in 2009.)

The fifth prediction, however, should attract the most attention from consumers. In it, IDC predicts that (surprise, surprise) mobile devices are becoming more important. IDC takes the extra step, however, and claims that they're becoming platforms in their own right, and will eclipse PCs in their connections to the Internet. In total, over 1 billion phones will ship in 2010, IDC predicts, and about 16 percent of those will be smartphones.

IDC then goes on to call an Apple tablet a "no brainer":

"This year, however, we predict that Apple will finally introduce this new device family, which is more of an oversized (8in., 10in.) iPod Touch than a downsized Mac -- and if you look at the developer energy around the iPhone/Touch platform, this should be no surprise at all," IDC claimed. "This prediction is a no-brainer: there's enormous appeal in sizing up the iPhone/Touch for a variety of applications and activities that people already use those devices for but would jump at the chance to have a larger screen -- watching videos/movies, reading books/magazines/newspapers (it would take a big bite from the Kindle), surfing the Web, videophone, and online gaming. Look for Apple's "iPad" by year-end 2010. Oh, and don't be surprised to see Microsoft also announce its own device in this space."

IDC also predicts that there will be over 300,000 apps for the iPhone platform, and 50,000 to 75,000 apps for the Google Android OS, possibly fractured by the varying form factors of Android devices.

Unfortunately, IDC also trumpets the return to "good, better, best" pricing on netbooks, meaning an overall rise in ASPs. Over 40 million netbooks should ship, up from 30 million in 2009, according to the firm.

IDC also skewers 4G hype, claiming that only 125,000 phones will be 4G capable in 2010. 3G radios will continues to improve (HSPA+) while more and more devices will include 3G technology as "invisible" connectivity, a la the Amazon Kindle. The firm also predicted that so-called "over-the-top" VOIP services like Google Voice will be more heavily regulated by the FCC.

IDC also placed some bets on mergers and acquisitions: IBM buying Juniper Networks was one, and the firm also predicted Canon would buy its way further into the printing services business. But Cisco and EMC will not merge, IDC's crystal ball said.

Other predictions included a dramatic expansion of cloud-based services, IT growth driven by emerging markets, and a 15 percent U.S. penetration of smart meters and a 25 percent penetration of electronic health records.

Lenovo Extends Cyber Monday Sale

lenovo_CM_sale.gif

Black Friday and Cyber Monday may be over, but Lenovo is extending its sale to offer you some great savings on Lenovo laptops and desktops. Save between 15 percent to 48 percent off with coupon code USPCBRMONDAY.

There are some great deals to be found, but one of the best is the ThinkPad T400, which is going for about 48 percent off of list price $1,205. The sale price is $739, but with the coupon code, you can get it for $628.15.

PCMag reviewed the T400, and gave the business laptop a 4.5 out of 5 rating and an Editors' Choice award its up-to-date performance parts and a new Centrino 2 feature named Switchable Graphics.

Continued after the jump!


Another good find is the IdeaPad Y550, which is discounted by about 48 percent, as well. It has a list price of $1,043, and a sale price of $645, but you can get it for $548.25 with the eCoupon, saving you $494.75.

PCMag did not review the IdeaPad Y550, but it did review the IdeaPad Y650.

Dell's Cyber Monday Deals Feature Netbooks, TVs

Dell is literally counting down the seconds left in Cyber Monday is over. As of right now, you have about 13 hours and 20 minutes to save.

Dell is offering the Mini 10v starting at $279, after $119 in instant savings. The offer ends at 12 a.m. CT on December 1. The Mini 10v has a 10.1-inch widescreen display, and a built-in 1.3MP Webcam. PCMag reviewed the netbook and gave it a rating of 3.5 out of 5 for its long battery life (up to 8 hours).

Other deals include:
  • 47-inch Sharp 120Hz LC47SB57UT HDTV for $799, down from $1,199.
  • Save $269 on the Inspiron 17 Laptop, now $549.
  • Inspiron 546 Desktop with 19-inch Monitor for $499, after $198 in savings.
  • Vizio 37-inch 1080p TV for $499.99, after $100 in instant savings.
Check out Dell.com for the full list of Cyber Monday deals. And don't forget to shop safely this Cyber Monday. Check out PCMag's tips on safe online shopping.

Acer Says Windows 7 Good for Sales

TOKYO - Taiwan's Acer Inc, the world's No.2 PC maker, said Microsoft Corp's Windows 7 operating system launch last month has been positive for year-end PC sales, though the gains were within expectations.

Acer's CEO said it was keeping its quarterly revenue outlook and maintaining a 15 percent sales growth target for next year.

The market leader in low-cost netbooks, or stripped-down laptop PCs geared for Web surfing, has said it expected sales in October-December to stay flat from the previous quarter and rise 25 percent from the previous year.

"When we saw the features of Windows 7, we already knew that it would be good for demand," Gianfranco Lanci told reporters on Thursday. "We have no plans to revise."

No.3 PC maker Dell Inc said it saw a spike in sales thanks to the Windows 7 launch. Hewlett-Packard, the world's No.1 PC maker and largest supplier of technology products, raised its annual outlook as growth in China helped its quarterly sales.

Acer, which expects 50 percent growth in the global netbook market to 42 million units in 2010, reported a quarterly net profit of $108 million last month, up 14 percent from a year earlier.

It now hopes to become the No.3 PC maker in both Japan and in China by 2011, up from about what it sees as the fifth or sixth place in both markets.

Apple Asks Judge for Permanent Psystar Injunction

Apple review, Apple commentary, Apple news... Everything Apple

Apple on Tuesday asked a California district judge to permanently prevent Psystar from infringing on its copyrights.

"Unless Psystar is permanently enjoined, it will not stop its unlawful conduct – conduct that is causing irreparable harm to Apple's business, brand, and goodwill," Apple said in a filing.

Apple and Psystar have been locked in a legal battle since July 2008, when Apple sued Psystar for eight claims of copyright infringement, breach of contract, trademark and trade infringement, and unfair competition. Psystar was selling a computer that uses an unauthorized, modified version of Apple's OS X, Apple said.

Psystar filed a countersuit the following month, which argued that Apple's legal and technical maneuvers were preventing a market for third-party Mac clones.

Earlier this month, Apple won a motion for summary judgment against Psystar. Judge William Alsup ruled that Psystar had violated Apple's rights to reproduce OS X, distribute it, and to create derivative works.

Apple now wants Psystar banned from: directly or indirectly infringing on its copyrights for Mac OS X; and circumventing any of Apple's technological protection measures in Mac OS X, including those that can generate Apple's decryption key.

Psystar's infringement is "undisputed and overwhelming," Apple said.

Apple has requested damages, but said that "money damages alone could never compensate for the irreparable injury that Apple has suffered."

"A failure to enjoin Psystar from continuing its unlawful activities would constitute an involuntary license of Apple's immensely valuable intellectual property and encourage others to follow Psystar's pattern of deliberate disregard of well-established law," Apple said. "Accordingly, this Court should grant a permanent injunction of a scope that will unequivocally end Psystar's unlawful conduct."

In order to be eligible for an injunction under the Copyright Act and the Digital Millennium Copyright Act (DMCA), a company must demonstrate irreparable harm, that money damages are inadequate, and that the public would not be harmed by the injunction – all things, Apple said, that it can prove.

Psystar has been rather quiet since August, when it posted a blog post discussing plans for depositions with high-ranking Apple officials.

The two sides are scheduled to meet again in court on December 14.

Apple Wins Big Against Psystar

Apple won a motion for summary judgment in its suit against Psystar Corp., which covered copyright infringement. A number of other claims, such as breach of contract, remain for trial.

The ruling, filed in the Northern District Court of California on Friday, was posted by Groklaw on Saturday.

Judge William Alsup found for Apple on every count that he ruled upon, with the primary focus on copyright. Here, Judge Alsup ruled that Psystar had violated Apple's rights to reproduce OS X, distribute it, and to create derivative works.

Apple originally filed suit in July 2008, after Psystar had begun shipping its own PCs, dubbed "Open Computers," with a copy of Apple's Mac OS X upon them. After a judge tossed out Psystar's antitrust accusations, Judge Alsup allowed Psystar to alter its suit to address alleged copyright misuse by Apple. Meanwhile, Psystar continued to manufacture Mac clones, and even the software tool Psystar used.

The judge noted that Psystar did not defend its right to modify the OS X for limited purposes, as it has a right to do. The judge also ruled out a "fair use" defense.

Psystar also argued that it had the right to sell OS X as part of the first-sale doctrine. The judge ruled that any copies were not made with the permission of Apple. In any case, the copies installed on the Open Computers, in some cases, did not even match up with the "backup copies" sold together with the computers, the judge wrote.

"There, [Apple expert John] Kelly stated that he had examined nine Psystar computers that had Mac OS X installed on the hard drive," the judge wrote. "He further stated that the Mac OS X software for five of those computers was not the same as the software found on the Mac OS X DVDs shipped with the computers. Instead, those computers had a different version of Mac OS X actually installed on hard drive than was found on the accompanying Mac OS X DVD. According to Table 2 in Kelly's declaration, three of the other nine computers did not include a Mac OS X DVD at all."

The judge ruled that the bootloader added to the Open Computers would render the computers unusable if they were removed. "The inclusion of the copyrighted Mac OS X with the above-described additions and modifications makes Psystar's product an infringing, derivative work," Judge Alsup wrote.

The judge also found for Apple on the issues of contributory infringement, copyright misuse, and violation of the DMCA. In the latter case, the judge concluded that an unauthorized copy of the OS X software was written to RAM. Psystar also circumvented Apple's copy protection and other technological measures in "modifying" OS X for its own purposes, the judge said.

Judge Alsup also noted that Apple has not formally asked for an injunction against the sale of Psystar's products, and declined to rule. The judge also noted that Apple had not raised claims on breach of contract, induced breach of contract, trademark dilution, and infringement, and other breaches of California law. Those claims can proceed to trial, the judge said.

A hearing to determine what sort of relief Apple can ask for will be held on Dec. 14.

Monday 23 November 2009

Games Hacking


Aku punya satu games hacking yang asik buat dimaenin, dicoba deh ya? :)

Disini kamu bermain sebagai uplink agent yang berkerja disebuah perusahaan bwsar. Tugasmu adalah merentas masuk ke dalam system computer rival persahaan tempat kamu berkerja, mencuri hasil data penelitian, mensabotase perusahaan lain, money laundering, menghapus bukti kejahatan atau mencari kambing hitam :p

Untuk mengupgrade system computer kamu, gunakan saja uang hasil dari keberhasilan kamu sebelumnya, dan juga bisa untuk membeli software dan peralatan tambahan. Jika level kamu meningkat, kamu akan bertemu tantangan yang lebih berbahaya dan level lain yang awalnya tersembunyi akan bermunculan. Kamu juga bisa memodifikasi pendidikan seseorang atau catatan kriminal seseorang.

Pokoknya games ini asik deh....di download terus di coba aja ya? :)

DOWNLOAD DISINI AJA

File rahasia dalam format JPG


Beberapa waktu yang lalu, Amrik pernah mengklaim kalau Al-Qaeda telah mengirim pesan rahasia yang terenkripsi dan menyembunyikannya dalam sebuah gambar digital (file *.JPG) di eBay. Dan akhirnya dugaan tersebut tidak pernah terbukti.

Sebenarnya cukup mudah untuk menyembunyikan (bending) file-file ke dalam gambar JPEG. Kamu bisa meletakkan file video clips, pdf, mp3, document office, file zip, webpage atau file dengan format-format lainnya kedalam image JPEG.

Dan kalau sebenarnya bila kita coba melihat secara normal dengan membuka file tersebut dengan cara preview maka yang terlihat adalah betul-betul berformat gambar (*.JPG), tapi jika kita memilih open with dan pilih winrar maka file yang tersembunyi disitu akan terbuka :)
Perbedaannya adalah zise dari gambar itu menjadi lebih besar!!! yang awalnya misalnya 100Kb menjadi 139Kb (tergantung dari file yang disembunyikan didalamnya).


Nah...sekarang kita berandai-andai aja nih, misalnya saja kamu mau mengirim sebuah document rahasia ke sebuah badan inteligen, terus kamu harus diperiksa dulu sama petugas investigasi perbatasan negara, mungkin karena di anggap mata-mata musuh maka semua bawaan kamu harus diperiksa. Terus supaya dokumen kamu gak kedeteksi oleh petugas pemeriksa perbatasan negara, kamu harus menyembunyikan dokumen penting ini.Yang kamu perlukan adalah mengkonversi file rahasia kamu itu kesebuah format JPG asli, jadi kalaupun petugas pemeriksa itu men-double klik file JPG nya,yang dia lihat hanya sebuah preview dari gambar tersebut dan tidak akan ada yang lain.

Sekarang kita praktek aja biar gak bingung ya?

  1. Siapkan sebuah file gambar dan file-file yang ingin kamu sembunyikan di dalam format JPG ini. Kemudian sebaiknya file yang ingin di sembunyikan kamu kompress dulu menjadi satu, bisa dengan menggunakan winrar atau winzip. Copy file-file tersebut dalam sebuah folder (hanya untuk memudahkan saja).
  2. Kemudian bukalah command prompt. Cara buka command prompt udah taukan? :p (Start>>All Programs>>Run>>ketik CMD).

  3. Arahkan dimana folder tempat kamu simpan/copy file-file yang kamu buat tadi, misalnya folder itu kamu buat di drive C: maka ketik saja "cd \" (tanpa petik). Maka kamu sekarang berada di drive C nya langsung sekarang. Kemudian ketik "cd rahasia".

  4. Dan ini lah perintah yang sangat penting dalam menggabungkan kedua file tadi: "copy /b pic.jpg + file_rahasia_nih.rar ketipu_deh.jpg" (tanpa petik). Maka jadilah sebuah file berfomat *.JPG dengan judul "ketipu_deh". :p Dilihat aja dalam foldernya tadi, ada nambah satu file JPG kan? dan dengan sizeyang berbeda.

  5. Dan bila kamu mau membuka kembali file yang tersimpan didalamnya hanya perlu software kompresi (7-zip, winrar, winzip etc). Tinggal klik kanan aja lalu pilih open with dan pilihlah "winrar archiver"


Gimana? gak susah kan? :) mau dicoba sendiri gak? coba aja deh ya?...biar lebih pinter :D

Little Trick About YM!


Si willy nyemangati aku nyuruh banyakin trick-nya, waktu awal bacanya rada-rada lucu juga, soalnya kebayang ama cheerleader yang lagi nyemangati pemain supaya tambah semangat :D . Tapi sempet bingung juga, soalnya mau ngasih tips apa lagi yah?....sebenarnya masih sangat banyak tips dan trick dalam computer, tapi emang dasarnya aku aja yang gaptek tentang masalah computer :p
Aku ada satu lagi nih mau dibagi, tentang cara melihat status invisible seseorang beneran gak dia invisible atau ........ :p Ini hanya mengandalkan dari software YM! itu sendiri, gak pake software lain.


Kadang waktu kita sedang memakai YM! ada beberapa teman kita sedang dalam kondisi offline, tapi apa kamu yakin dia emang offline? atau hanyainvisible aja? :p
Kalau pun teman kita sedang online tetapi memakai status invisible pasti ada alasannya, mungkin saja dia emang lagi sibuk untuk "berbicara" sama kita.

Ada trick sederhana yang bisa kamu pakai untuk mencari kebenaran, apakah betul teman kamu itu emang gak online atau cuma sedang dalam kondisi invisible, caranya gini:
Pertama kali buka dulu Yahoo Messenger kamu, lalu login dan klik dua kali nama teman yang ingin kamu test. Kemudian window buat dhating akan muncul.

Klik tombol IMVironment, pilih See All IMVironment, Pilih Yahoo! Tools atau Interactive Fun, dan klik di Doodle.
Setelah loading Doodle Imvironment nanti akan ada dua kemungkinan:

1. Kalau Teman kamu emang beneran sedang offline Doodle akan memberikan pesan "waiting for your friend to load Doodle" secara terus menerus.

2. Jika teman kamu sedang offline (padahal sebenarnya lagi invisible :p ), setelah beberapa detik (bisa juga memakan waktu satu menit, tergantung dari koneksi internet masing-masing), kamu akan mendapatkan sebuah halaman kosong seperti gambar dibawah ini. Jadi kamu tau kalau sebenarnya teman kamu itu tidak offline, tetapi sebenarnya sedanginvisible. :)

Trick sederhana aja nih...soalnya baut trick yang rada canggih aku belum tau, ada yang mau ngajarin aku gak? :p

Mengakali MAC Filtering


Kegiatan ini aku lakukan karena waktu itu aku dalam kondisi yang betul-betul bosan banget:( . Ceritanya gini, Kemaren sempet nginap di rumah teman, kebetulan orang tuanya lagi keluar kota jadi dia minta temenin aku di rumahnya.eitsss...jangan ngeres dulu yah, ini temen cewek juga loh :p

Aku dengan kedua temanku yang lain lagi ngobrol-ngobrol, tapi lama-lama bosan juga :( gak bisa ngenet sih soalnya. Mau ngenet via warnet males, habisnya hujan terus. Ujung-ujungnya aku maen games di notebook temanku...Tapi itu juga lama-lama bikin bosaaaaannnnn banget... :( yah dari pada gak ada kerjaan laen iseng-iseng aku coba install kan software buat wardriving, aku pakai netstumbler. Kali-kali aja ada signal wireless yang lewat :p
Eh gak taunya dapet dua buah signal disitu...YEAAAAPIIII............Coba di konekin ahh... :D

Dari status yang aku lihat di netstumbler sih gak di protect ama "tuan rumahnya" :p di coba ahh...sapa tau konek :p

Wew...ternyata gak segampang yang aku kira :( terpaksa deh coba sniffing paketnya dulu...Sepertinya DHCP dimatiin ama si admin.

Aku coba aja dulu untuk sniffing IP yang lewat disitu, software sniffing yang aku gunakan disini adalah wireshark.
Setelah beberapa lama nungguin paket yang lewat aku dapetin beberapa IP local yang ada disitu. Nah setelah dapet IP lokal-nya, lalu aku pake software SCANNER IP punyaku.

Setelah aku dapat range IP yang aktif (ofcoz dengan cara menduga-duga juga soalnya :p ) kemudian aku rubah IP ku dengan pengaturan manual. Aku coba konekin lagi tapi masih juga gagal buat konek keluar. Diem bentar (lagi bingung juga soalnya :p )...baru setelah itu aku ingat, siapa tau si admin memakai proteksi lain selain manual configure IP, mungkin si admin memakai proteksi tambahan MAC Filtering...siapa tau aja? Aku instal software pengganti MAC Address, Software yang aku gunakan itu namanya A-MAC ADDRESS CHANGER.

Setelah di crack buat jadiin full, sekarang tahap aku harus cloning-kan MAC ku dengan MAC IP yang lewat tadi. Setelah di cloning, A-MAC minta restart buat mengaktifkan MAC ku yang baru, ikutin aja ahh...... :)
Setelah restart, langsung aku coba konekin lagi dan TADAAA........konek deh aku ke http://zeskya.blogspot.com :p

Oh iya...ini hanya cerita-cerita saja, gak ada maksud laen :D mohon maaf jika ada salah ya? Ini juga terjadi secara kebetulan.

20 Hacking tools


Aku punya beberapa tools buat hacking, ini aku dapat setelah menjelajah dunia maya dan bertapa 30 hari 30 malam, ketemu ama kakek-kakek. Dia bilang sama aku (gaya orang tua ngomng) "cucuku...aku terima tapamu selama ini, sekarang aku akan beri apa yang kamu mau, sebutkan...kamu mau apa?" langsung aja aku jawab "kakek yang baik, aku minta dong tools buat hacking". Kakek itu terdiam sebentar, tapi kemudian sambil mengelus jenggotnya dia berkata "boleh-boleh...kakek punya apa yang kamu mau, ini kakek simpan sebagai pusaka sejak jaman dulu, sekarang kakek turunkan untuk kamu". Dan tiba-tiba sinar merah pun turun dari langit dan tau-tau aku lihat sebuah CD jatuh di depan mataku. Kakek itu berkata "ambillah cucuku...itu untuk kamu, tapi pergunakan dengan baik ya?". hihihi....itu hanya intermezo aja kok. :p
coba aja disimak tools yang ku maksud tadi :)

These are Top 20 Hacking Tools, the list is exhaustive, this are a few to name.

Nessus

The “Nessus” Project aims to provide to the internet community a free, powerful, up-to-date and easy to use remote security scanner for Linux, BSD, Solaris, and other flavors of Unix.

Ethereal

Ethereal is a free network protocol analyzer for Unix and Windows. Ethereal has several powerful features, including a rich display filter language and the ability to view the reconstructed stream of a TCP session.

Snort

Snort is an open source network intrusion detection system, capable of performing real-time traffic analysis and packet logging on IP networks.

Netcat

Netcat has been dubbed the network swiss army knife. It is a simple Unix utility which reads and writes data across network connections, using TCP or UDP protocol

TCPdump

TCPdump is the most used network sniffer/analyzer for UNIX. TCPTrace analyzes the dump file format generated by TCPdump and other applications.

Hping

Hping is a command-line oriented TCP/IP packet assembler/analyzer, kind of like the “ping” program (but with a lot of extensions).

DNSiff

DNSiff is a collection of tools for network auditing and penetration testing. dsniff, filesnarf, mailsnarf, msgsnarf, urlsnarf, and webspy passively monitor a network for interesting data (passwords, e-mail, files, etc.).

GFI LANguard

GFI LANguard Network Security Scanner (N.S.S.) automatically scans your entire network, IP by IP, and plays the devil’s advocate alerting you to security vulnerabilities.

Ettercap

>Ettercap is a multipurpose sniffer/interceptor/logger for switched LAN. It supports active and passive dissection of many protocols (even ciphered ones)and includes many feature for network and host analysis.

Nikto

Nikto is an Open Source (GPL) web server scanner which performs comprehensive tests against web servers for multiple items, including over 2500 potentially dangerous files/CGIs, versions on over 375 servers, and version specific problems on over 230 servers.

John the Ripper

John the Ripper is a fast password cracker, currently available for many flavors of Unix.

OpenSSH

OpenSSH is a FREE version of the SSH protocol suite of network connectivity tools, which encrypts all traffic (including passwords) to effectively eliminate eavesdropping, connection hijacking, and other network-level attacks.

TripWire

Tripwire is a tool that can be used for data and program integrity assurance.

Kismet

Kismet is an 802.11 wireless network sniffer - this is different from a normal network sniffer (such as Ethereal or tcpdump) because it separates and identifies different wireless networks in the area.

NetFilter

NetFilter and iptables are the framework inside the Linux 2.4.x kernel which enables packet filtering, network address translation (NAT) and other packetmangling.

IP Filter

IP Filter is a software package that can be used to provide network address translation (NAT) or firewall services.

pf

OpenBSD Packet Filter

fport

fport identifys all open TCP/IP and UDP ports and maps them to the owning application.

SAINT

SAINT network vulnerability assessment scanner detects vulnerabilities in your network’s security before they can be exploited.

OpenPGP

OpenPGP is a non-proprietary protocol for encrypting email using public key cryptography. It is based on PGP as originally developed by Phil Zimmermann.

Nah...tinggal dipilih aja sesuai keperluan ya? :p
Sebetulnya masih banyak tool-tool yang lainnya, tapi untuk sementara yang ini aja dulu ya? :)

Membongkar Password Winrar dan Winzip


Pernah gak kita lupa dengan password hasil kompresan kita lewat winrar atau winzip??? kalau gak pun mungkin buat buka password file yang dienkripsi di winrar punya orang laen ya??? :p
aku pengen bagi dikit tentang software pembuka password, tepatnya untuk mengetahui password yang digunakan di winrar itu.

Aku gak tau apakah ini salah satu jenis hacking atau gak, tapi yang pasti dia menjebol suatu system security yang telah dibuat (hacking gak ya???) :D
Nama software ini Advanced Archive Password Recovery v4.50
ini reviewnya:

An application that will help you to recover lost or forgotten passwords to ZIP , ARJWinARJ, RARWinRAR and ACEWinACE archives

Backup archives locked with a password? Can’t access compressed archives from the last year? Unlock password-protected ZIP, RAR, ACE and ARJ archives quickly and efficiently!
Advanced Archive Password Recovery allows you to backup lost or forgotten passwords.from plain and self-extracting archives created with all versions of PKZip, WinZip, RAR, WinRAR and compatible products in their GUI and command-line incarnations. Latest implementations of AES encryption and the two-gigabyte archives are supported.


Remember something about the password? Great! Advanced Archive Password Recovery will use every bit of information about the password for even faster recovery. Totally blank about it? No problem! Advanced Archive Password Recovery will attempt dictionary and brute-force attacks completely automatically. Have just a single file from the encrypted archive? Unlock the entire thing and decrypt all files in minutes – no matter how long and complex the password was thanks to the known-plaintext attack!
Did you know that not all archives are equally protected? Early versions WinZip had a weakness in the implementation of their encryption scheme, allowing Advanced Archive Password Recovery to unlock archives created by WinZip 8.0 and earlier versions in under one hour – guaranteed if there are 5 or more files in the archive.

The dictionary attack takes care of passwords based on words in a human language, while the brute force attack can unlock your archives if everything else fails. The intuitive user interface allows specifying a variety of masks and attacks, while the highly-optimized low-level code ensures the best performance and the quickest recovery of the most complex passwords.

Low-level optimization leads to password recovery speed of millions passwords a second. Running Advanced Archive Password Recovery in background utilizes the idle CPU cycles without affecting your regular work. Stop and resume the recovery at any time to make the recovery process even less obtrusive.

Features:

· Supports all versions of ZIP/PKZip/WinZip, RAR/WinRAR, as well as ARJ/WinARJ, and ACE/WinACE (1.x)
· Guaranteed recovery of archives in under 1 hour for ZIP archives created with WinZip 8.0 and earlier and containing at least 5 files
· Supports archives over 4 GB and self-extracting archives
· Supports strong AES encryption found in WinRAR and the new versions of WinZip
· Exploits all known vulnerabilities and implementation flaws in the various compression algorithms for faster recovery
· Speedy known-plaintext attack recovers certain ZIP and ARJ archives in minutes (user must supply at least one unprotected file from that archive)
· Interrupt and resume operation at any time
· Supports background operation by utilizing idle CPU cycles only
· Dictionary and brute-force attacks with user-defined masks and advanced templates
· Highly optimized low-level code for optimum performance


= System requirements =
- Windows 2000, Windows XP, Windows Vista, Windows Server 2003, Windows Server 2008

Tentang Internet Download Manager (IDM)


Kali ini aku mau berbagi tentang software downloader yang bagus. Software ini bisa mendownload otomatis bila kita mengklik file yang ingin di download dan mempunyai format yang telah di isikan/berisi di dalam downloader itu. Nama downloadernya Internet Download Manager.
Ada beberapa tips yang ingin aku berikan jika menggunakan software ini.

Sebelumnya silahkan download Internet Download Manager (IDM) v.5.14 disini.
Tips ini untuk menambahkan format file bisa di download oleh IDM, setelah di instal silahkan dibuka IDM hasil instalan tadi, lalu buka di Download >> Option >> File Types. Supaya IDM bisa mendownloadformat dengan type FLV (format film yang biasa ada pada http://www.youtube.com) tinggal kamu tambahkan saja dengan mengetik "FLV" (tanpa tanda petik) pada kotak type-type filenya. Dan jika ada type file lain yang ingin ditambahkan, silahkan lakukan dengan cara yang sama dengan mengetikan type file yang bisa otomatis di download oleh IDM ini.
Dan satu lagi, cobalah dirubah type koneksinya lewat Download >> Option >> Connection. pada kotak pilihan "Connection Type/Speed" rubahlah menjadi LAN 10Mbs, dan pada kota "Def Max. Conn Number" silahkan di rubah menjadi 16.
Mudah-mudahan bermanfaat ya guys.. ;)

Hacking Login Password

Nah...sekarang kita belajar hacking kecil-kecilan ^_^
Yang mau kita hacking sekarang adalah "Pasword Login". Pernah gak ngerasa atau ada teman/saudara/pacar yang lupa pasword waktu mau masuk windowsnya???? kalau gak yo wes...monggo cari postingan yang lain..hehehe... (just kidding).
Bisa saja OS (Operating System)nya di instal ulang, tapikan butuh waktu lagi, mana lagi kalau cd OS nya gak ada. Makanya daripada pusing-pusing instal ulang hanya karenalupa pasword loginnya kita gunakanan Emergency Boot CD (EBCD),lebih simple dan gampang.
Yang perlu disiapkan hanya CD bootable-nya EBCD (bisa didownload di link Download). dengan CD blank buat burn file imagenya pake Nero atau apapun terserah. Sekarang kamu tinggal ikuti langkah-langkahnya:

1. Download EBCD V.0.6.1 di sini.
2. Setelah selesai, silahkan di ekstrak di komputer terserah mau simpan dalam directory yang mana.
3. Hasil dari ekstrakan tadi kita akan dapat sebuah folder dengan nama "ebcd-0.6.1-pro".
4. Instal "makeebcd"...tunggu sampai selesai, setelah selesai akan ada tulisan "press any key", nah...hasil instalan tadi kita akan dapat sebuah file ISO dengan nama "EBCD061P".
5. Silahkan di burn ke dalam cd blank yang tadi disiapkan.

Sekarang kita masuk ke dalam alur proses hacking kecil-kecilan mereset password login tersebut:

1. Ubah pengaturan boot agar booting pertama dari CD melalui BIOS.
2. Pada menu utama pilih opsi (5) "NT Passoword editor (Linux-based)".
3. Akan muncul pesan ” Swap to SCSI-drivers disk now if needed…”. Tekan Enter. Akan muncul daftar partisi seperti ini.

* Device Boot Start End Blocks
* /dev/hda1 * 1 … …….
* /dev/hda22
* /dev/hda3

Yang mana tanda bintang * (Bintang) tersebut merupakan partisi file SYSTEM.

1. Masukkan Volume Label (nama dari partisi) tersebut.
2. Akan muncul pertanyaan "What is the full path to the registry directory?". Tekan Enter.
3. Akan muncul daftar file. tekan Enter lagi.
4. Keluar sebuah menu yang kira-kira bunyinya "=====Chntpw Main Interactive Menu ======" Pilihan 1 (Edit user data and password) terpilih secara default. Tekan saja Enter.
5. Setelah itu muncul tulisan"====Chntpw Edit User Info & Passwords ====". Disertai daftar user dan password. Account dengan tambahan *Disabled or Locked* adalah akun terpassword. Masukkan nama Accountyang akan kamu bobol passwordnya.
6. Masukkan password baru atau ketik saja * (Bintang) untuk mengosongkan passwordnya.
7. Seting passwordnya ke “never expire”. Lalu akan muncul pertanyaan Do you really wish to change it?. Tekan saja “Y” lalu Enter.
8. Lalu pilih “!” untuk kembali ke menu utama. Lalu tekan “q” untuk keluar.
9. Akan muncul pertanyaan "Write hive files?", tekan “y”.
10. Akan muncul pertanyaan lagi, cukup tekan “y” kembali.
11. Restart, dan jangan lupa keluarkan CD nya.
12. Finish!!!!

Sekarang gak perlu pusing lagi dengan lupa password login kan??? ^_^

Silahkan mencoba...Good luck!!!

Reset Printer Canon MP160 dan MP180


Tanggal 17 Agustus, Kemerdekaan RI nih....tapi apa betul kita sudah merdeka???? Pertanyaan yang sering dilontarkan oleh orang-orang. Kalau aku rasa sih...belum kayaknya :D. Ya udah deh...gak akan habis kalau sekarang ngomongin masalah kemerdekaan, sebaiknya kita pikirkan aja bagaimana cara kita mengisi kemerdekaan itu sendiri, tul gak???? ;)
Kali ini aku mau berbagi tentang cara reset Printer Canon MP160 dan MP180.
Tidak semua printer MP dapat di reset seperti cara ini, cara ini bisa di lakukan pada canon MP160 dan MP180. Beberapanya lagi dari tipe MP ini dapat juga dilakukan reset seperti cara mereset printer Pixma. Reset softwarenya udah aku sediain di link download, silahkan di unduh.
Ok deh...sekarang kita coba reset ya??? :)

Oh iya...sebelumnya untuk software resetnya download aja disini ya...ini buat ip 1700_1300, ini buat iP1200_iP1600_iP2200, ini buat iP1500, ip 1880, ini reseter ip, dan ini buat reseter tipe MP.
Nah sekarang kita kerjakan ya?? ;)
1. Cabut kabel Power
2. Tekan dan tahan Tombol “Power” (On/Off)
3. Masukkan kembali kabel Power
4. Tekan “Reset” dan lepaskan
5. Lepaskan tombol “Power”
6. Apabila berhasil lampu Alarm akan menyala (jika belum ulangi kembali).
7. Setelah itu software MP Tool akan terdeteksi, sekarang jalankan software tersebut.

Dibawah ini ada beberapa code error beserta arti dari error tersebut:

1. E9 The connected digital camera / video camera does not support Camera Direct Printing
2. E14 The Ink cartridges whose destination are wrong
3. E15 Ink cartridge is not installed E16 - Ink remaining is unknown
4. E16 -E19 Failed to scan head alignment sheet
5. E22 Carriage error
6. E23 Paper feed error
7. E24 Purge unit error
8. E25 ASF(cam) sensor error
9. E26 Internal temperature rise error
10. E27 Waste ink absorber full or platen waste ink absorber full
11. E28 Ink cartridge temperature rise error -
12. E29 EEPROM error
13. E33 Paper feed position error
14. E35 15 USB Host VBUD overcurrent error - USB
15. E37 17 Abnormal motor driver error
16. E40 20 Other hardware error
17. E42 22 Scanner error
18. E2-2 No paper (ASF)
19. E3-3 Paper jam
20. E4 No ink
21. E5-5 The ink cartridges are not installed or a non-supported ink cartridge is installed, or the ink cartridges are not installed properly
22. E8 Waste ink absorber full, or platen waste ink absorber full

Nah ada gak yang dapat pengalaman seperti ini:
Setelah bisa keluar tintanya waktu kita ngerint tapi printernya sendiri mengatakan kalau Catridge-nya error...
nah ini ada cara buat betulinnya, supaya printernya gak "rewel" lagi:

1. Cabut kabel power printer
2. Tekan dan tahan tombol power
3. Colokin kembali kabel powernya
4. Tekan tombol reset 1x
5. Lepas tombol power lalu tekan tombol reset sekali lagi sampai menjadi "0"
6. Tekan tombol "+" untuk merubah angka "0" tadi menjadi "1"
7. Tekan tombol power sekali lagi, printer akan melakukan print 1 halaman dengan sendirinya.
8. Buka tutup printer
9. Cabut kabel power printer
10. Lepaskan kedua catrigdenya
11. Colokin kembali kabel power printer
12. Hidupkan printer dengan menekan tombol power
13. Buka tutup scanner
14. Masukkan kembali catrigde yang di lepas tadi
15. Printer tidak akan memberikan alarm bahwa tinta dalam kondisi low dan tidak akan menunjukkan error E5 lagi.

Satu lagi, ada beberapa tipe MP dan pixma ini menggunakan reset seperti ini:
1. Matikan printer, jangan dicabutt kabel powernya.
2. Tekan tombol resume lalu tekan powernya dan lepas tombol resume.
3. Tekan sebanyak dua kali tombol resumenya, lepaskan tombol powernya.
4. Tekan tombol resume 4x kemudian tombol poer sekali.
5. matikan printernya.

Mudah-mudahan bermanfaat :k

Reset Printer Canon Pixma


Sering waktu saat mendesak kita butuh satu dokumen dan pada saat pengen mencetaknya dan...oh no my God...printer sedang mabox berat...jengkel tetap ada, dongkol tetap bersemayam dihati, pengen rasanya dibanting tuh printer keblinger tapi...sayang...soalnya...ya sayang.. :D
Nah...ada beberapa tips sementara (atau bisa jadi paten) buat ngatasi masalah printer yang ngadat ini.
Buat printer canon pixma seri 1000, 1200, 1300, 1700, 2200, 1880 dan masih banyak lagi seri pixma yang dapat kita gunakan tehnik ini, buat softwarenya silahkan download (disini). Nih cara meresetnya:

1. Cabut kabel power printer.

2. Tekan tombol Power printer jangan dilepas.

3. Colokkan kembali kabel power printer tanpa melepas tombol power printer.

4. Tekan tombol Resume sebanyak 2 kali tanpa melepas tombol power.

5. Nah...sekarang tombol powernya boleh dilepas deh...pegel gak???

Untuk iP1880 biasanya saat pengisian refill terjadi blinking, coba di tekan tombol resume selama 15-30 detik dan coba lepas, jika masih blinking coba di tahan kembali tombol resume 15-30 detik. Dan jika masih blinking juga baru menggunakan tehnik reset manual point 1-5 diatas.

Sekarang yang terakhir adalah mempatenkannya dengan menggunakan software reset. Silahkan mendownload software reset tersebut dari link link download yang telah disediakan.

Dari masing-masing jenis printer agak berbeda dalam hal reset softwarenya, silahkan untuk dibaca dulu dan dipahami dengan jelas.

Nah selesai deh... tapi eiiiit...tunggu dulu...buat ngetesnya sekarang....coba dimatikan terus dicabut tuh kabel power printer, yaaaah...kira-kira 10 detik aja deh...terus di colokin kembali kabel powernya dan coba hidupkan lalu test print, jika semua berjalan lancar artinya kamu sudah bisa pasang plang "DISINI TERIMA SERVICE PRINTER BLINKING" ......(Just kidding).. :z :z :z

Good luck...

Memahami Arti Bunyi "BEEP"

Sewaktu komputer di hidupkan pertama kali atau setelah di restart kamu akan mendengar bunyi "TIIT" satu kali, nah...itulah yang dimaksud dengan bunyi "BEEP"!
Bunyi "BEEP" dipakai oleh BIOS saat POST (Power On Self Test) untuk melaporkan kondisi sistem tertentu. Jika kamu mendengar bunyi "BEEP" yang lain dari biasanya itu artinya sistem mengalami masalah sebelum bisa menampilkannya di monitor.
Dengarkan bunyi "BEEP" tersebut baik-baik, catat bunyinya, panjang pendek dari bunyinya. Karena masing-masing bunyi "BEEP" antara BIOS merk satu dengan yang lain kadang berbeda antara panjang pendek dari bunyi "BEEP" itu, jadi kenali dulu merk dari BIOS kamu.

Di bawah ini ada beberapa kode "BEEP" dari beberapa merk BIOS.
1. AMIBIOS
American Megatrends Inc merupakan salah satu pembuat software BIOS teratas di dunia. BIOS dari AMIBIOS hanya akan berbunyi jika ada masalah:

* 1 s/d 3 beep, berkaitan dengan memory yang perlu dipasang ulang atau dicoba dengan memory yang lain.
* 4 beep, berkaitan erat dengan motherboard. Coba dipasang ulang semua card tambahan (sound card, modem, tv tuner, dll. kecuali VIDEO CARD.)
* 5 beep, berkaitan erat dengan processor atau card tambahan. Coba dipasang ulang semua card tambahan, kalau bunyi beep masih juga ada baru telusuri processornya.
* 6 beep, berkaitan dengan motherboard. Coba dipasang ulang semua card tambahan yang ada, dengan melepas satu persatu dan di pasang kembali. Jika bunyi beep masih ada juga, kemungkinanya kamu kudu siap-siap merogoh kantong celana buat beli mainboard yang baru.
* 7 beep, Ini adalah bunyi yang berkaitan dengan error secara umum. telusuri satu persatu mulai dari card tambahan, processor, baru kemudian motherboard.
* 8 beep, berkaitan dengan Video Card. Coba dipasang ulang atau di coba dengan video card yang lain.
* 9 beep, berhubungan dengan AMIBIOS ROM checksum error. Coba lakukan seperti bunyi 7 beep.
* 10 beep, berkaitan dengan CMOS read/write error. Solusinya seperti bunyi 7 beep.
* 11 beep, berhubungan dengan kegagalan cache memory. Solusinya sama seperti bunyi 7 beep.
* 1 beep panjang, 2 beep pendek, berkaitan dengan kegagalan system video card. Solusinya sama seperti bunyi 8 beep.

Masih banyak bunyi beep yang lain lagi dari merk AMIBIOS ini, ini hanya sebagian kecil saja.
2. AWARDBIOS
Awalnya AWARDBIOS adalah sebuah merk BIOS yang dimiliki oleh sebuah perusahaan bernama Award, tapi kini Award telah diambil alih oleh Phoenix Technologies.
Berbeda dengan AMIBIOS, jika kamu mendengar bunyi beep 1 kali pendek itu artinya sistem dalam keadaan baik-baik saja.

* 1 panjang, 2 pendek: gangguan pada video card. Coba pasang ulang atau ganti dengan video card lain.
* 1 panjang, 3 pendek: video card tidak terdeteksi atau memory video cardnya error.
* 1 beep panjang bernada tinggi atau beep pendek yang berulang-ulang: Masalah pada processor, bisa jadi juga processor kepanasan, pemasangan tidak benar atau bahkan rusak.
* Beep lain selain yang sudah disebutkan diatas: ada error di memory.
3. Phoenix-BIOS
1x-1x-4x: BIOS rusak.
1x-2x-1x: Motherboard rusak.
1x-3x-1x: Masalah RAM, modul tidak terpasang dengan baik.
3x-1x-1x: Motherboard rusak.
3x-3x-4x: Graphic card rusak atau tidak terpasang dengan baik.

Aduh...capek juga ngetik lama-lama, sementara segini dulu ya??? tar aku sambung lagi dengan bunyi beep dari merk lainnya lagi.

Tentang BSOD (Blue Screen Of Death)


Blue Screen of Death (biasa dikenal sebagai stop error, BSOD, bluescreen atau Blue Screen Of Doom) adalah pesan kesalahan yang selalu di tampilkan dari system operasi tertentu, khususnya Microsoft Windows, setelah ditemukan kritikal system error yang mana menyebabkan system menjadi mati untuk untuk mencegah terjadinya kerusakan lebih parah. (http://en.wikipedia.org/wiki/Blue_Screen_of_Death)


Munculnya BSOD disebabkan karena berbagai masalah yang beragam baik dari sistem maupun dari perangkat keras. Munculnya BSOD sebenarnya dapat membantu kita untuk mengetahui di manakah kerusakan yang menyebabkan komputer kita menjadi rancu. Namun bagi pengguna awam, munculnya BSOD dapat berarti sangat menakutkan, karena justru pesan-pesan di BsOD dapat membingungkan pengguna awam, dan jujur saja, justru banyak pesan-pesan pada BsOD yang terkesan “tidak nyambung” dalam menjelaskan letak sektor masalah. Pada waktu aku menemukan BSOD yang pertama kali di komputer aku, aku hampir putus asa untuk mengatasi permasalahan yang diminta si BSOD.
Oke, kita kupas sebagian kecil saja isi dari BSOD ini. BSOD dikategorikan sebagai berikut:

Memory Dump Message: mengindikasikan bahwa semua proses yang saat itu sedang berlangsung di memory disalin ke dalam sebuah file di harddisk untuk kepentingan debugging. Biasanya file debugging ini dibutuhkan para teknisi untuk menganalisa dan memperbaiki kesalahan.

Pada pembahasan kali ini kita hanya akan membahas arti pesan-pesan error utama yang terdapat dalam BSOD , tidak termasuk dengan troubleshooting mendetail, yang apabila tak ada halangan InsyaAllah akan di posting di lain waktu:
Quote:
1. IRQL_NOT_LESS_OR_EQUAL (0X0000000A)

* Ini merupakan biangnya biang kerok pada BsOD. Kenapa? Karena umumnya pada BsOD, pesan ini yang paling sering muncul. Pesan kesalahan ini disebabkan umumnya kerena ada ketidakcocokan driver yang terinstall di komputer.

Daftar Penyebab:

* Masalah driver yang bentrok atau tidak cocok
* Masalah Video Card, hal ini mencakup video card yang di overclock melebihi batas atau Anda baru berganti Video card dan Anda belum menguninstall driver Video card lama dari chipset berbeda
* Masalah Audio Card, meliputi kesalahan konfigurasi atau bug dalam driver sound card

2. NTFS_FILE_SYSTEM atau FAT_FILE_SYSTEM (0X00000024) atau (0X00000023)

* Nah, pesan ini setidaknya sudah sedikit “nyambung” memberikan gambaran di mana kerusakan berada, yaitu ada di partisi atau filesystemnya tetapi bukan di harddisknya. Kita bisa melakukan pengecekan dengan memeriksa kabel SATA atau PATA atau bisa mengecek partisi dengan tool chkdsk.

3. UNEXPECTED_KERNEL_MODE_TRAP (0X0000007F)
Bila Anda mendapatkan pesan seperti ini, dapat disebabkan karena:

* Overclock Hardware yang berlebihan
* Komponen komputer yang kepanasan
* BIOS yang korup
* Memory dan CPU yang cacat

4. DATA_BUS_ERROR

* Pesan ini disebabkan karena adanya kemungkinan bahwa memory atau slot memory di motherboard rusak.

5. PAGE_FAULT_IN_NONPAGED_AREA

* Disebabkan karena adanya kerusakan hardware, termasuk memory utama, memory video card, atau memory di processor (L2 Cache)

6. INACCESSIBLE_BOOT_DEVICE

* Disebabkan karena adanya kesalahan dalam konfigurasi jumper harddisk yang salah, virus boot sector, driver IDE controller yang salah, atau kesalahan driver chipset.

7. VIDEO_DRIVER_INIT_FAILURE

* Kesalahan terjadi pada instalasi driver video card yang kurang sempurna, restart pada saat instalasi atau juga dapat terjadi karena kesalahan dalam instalasi driver.

8. BAD_POOL_CALLER

* Kesalahan ini dapat terjadi karena kesalahan atau driver yang tidak kompatibel. Sering terjadi saat melakukan instalasi XP dari upgrade, atau bukan dari instalasi baru.

9. PEN_LIST_CORRUPT

* Pesan ini disebabkan karena adanya kerusakan RAM

10. MACHINE_CHECK_EXCEPTION

* Disebabkan oleh cacatnya CPU, atau yang di overclock secara agresif, serta power supply yang kekurangan daya atau rusak.

Itulah sepuluh pesan yang umumnya muncul di BsOD, semoga tulisan ini dapat membantu kamu untuk menganalisa kerusakan yang terjadi di komputer kamu.
Peace....

About RAM (Random Access Memory)


RAM (Random-Acces Memory) merupakan salah satu jenis memory internal yang menentukan kemampuan sebuah komputer. Memory internal (Internal Memory) bisa disebut juga memory utama (main memory) dan memory primer (primary memory).

RAM adalah jenis memory yang isinya dapat diganti-ganti selama komputer hidup dan mempunyai sifat bisa mengingat data atau program selama terdapat arus listrik dan dapat menyimpan maupun mengambil data dengan sangat cepat.

Fungsi RAM adalah sebagai pengingat, dan juga sebagai berikut :

1. Menyimpan data yang berasal dari piranti masuk sampai data dikirim ke ALU untuk diproses.
2. Menyimpan data hasil pemrosesan ALU sebelum dikirim ke piranti keluaran.
3. Menampung program atau intruksi yang berasal dari piranti masuk atau dari piranti pengingat sekunder.

Tipe-tipe Memory RAM

1. SDRAM (Synchronous Dynamic RAM) - Type RAM yg dibuat pada tahun 1996. SDRAM merupakan RAM yg sangat legendaris, dan mampu bertahan lama dalam perkembangan system komputer. Sesuai dengan namanya SDRAM mempunyai term Synchronous Dynamic, yaitu kemampuan RAM untuk menyamai clock dengan clock processor. Jika clock RAM dan processor sama, maka system komputer akan berjalan seimbang karena aliran data diantara keduanya berjalan lancar. Karakteristik teknis SDRAM memiliki 168-pin, 3.3V & FSB 100/133 MHz. Saat ini SDRAM sudah tidak dipakai lagi oleh platform komputer, terakhir digunakan pada Pentium 4 versi generasi pertama. Tipe-tipe SDRAM : SDRAM 32, 64, 128, 256, 512MB PC100/133.
2. DDR (Double Data Rate) - Type RAM yg merupakan pengembangan lanjut dari teknologi SDRAM. DDR dibuat pada tahun 2000. DDR pertamakali dibuat sebagai pesaing utama dari memory RDRAM yg dikembangkan Intel dan Rambus pada awal generasi Pentium 4, dan saat ini menjadi mainstream dari platform komputer. Karakteristik teknis DDR adalah 184-pin, 2.5V & FSB 266/333/400 MHz. Secara teori DDR mempunyai kemampuan pengolahan dua kali lipat dibandingkan SDRAM, karena mampu membawa 2 bit pada satu clock-nya -dibandingkan SDRAM yg hanya 1 bit. DDR masih digunakan pada berbagai platform yang ada, seperti Pentium 4 & Celeron D dan akan segera digantikan dengan teknologi DDR2. Tipe-tipe DDR : DDR 128, 256, 512, 1.024MB PC2100/2700/3200.
3. DDR2 (Double Data Rate Generation 2) - DDR2 merupakan generasi lanjutan dari DDR dengan perbaikan berbagai fitur, seperti penggunakan IC BGA (Ball Grid Array) yg tahan panas & memiliki densitas tinggi serta FSB yang lebih tinggi. Karakteristik teknis DDR2 adalah 240-pin, 1.8V & FSB 400/533/667/800 MHz. DDR2 memiliki kapasitas yang lebih besar dari DDR, dimana nantinya bisa mencapai 2GB / modul. Dan saat ini DDR2 akan menjadi standar untuk semua platform Intel 2006 dan seterusnya. Tipe-tipe DDR2 : DDR 256, 512, 1.024MB PC3200/4300/5300/6400.
4. RDRAM (Rambus Dynamic RAM) - Type RAM yg pertamakali dibuat tahun 1999. RDRAM merupakan RAM yg menggunakan teknologi baru yg dikembangkan oleh perusahaan bernama Rambus. RDRAM mempunyai kemampuan bandwidth yg menyamai kebutuhan bandwidth pada processor Intel Pentium 4. Teknologi Dual Channel pertamakali diperkenalkan oleh RDRAM. Berbeda dengan yg lain RDRAM mempunyai tipe pengolahan Serial, dibanding SDRAM & DDR yg mengolah secara Paralel. Karakteristik teknis dari RDRAM adalah 184-pin, 2.5V & FSB 800, 1.066 dengan aristektur 16-bit (2 byte). Saat ini semua tipe RDRAM tidak digunakan lagi pada komputer karena harganya yg terlalu mahal dan performance-nya sudah dapat disamai oleh DDR/DDR2. Tipe-tipe RDRAM : RDRAM 64, 128, 256, 512MB PC800/1.066 MHz.

Troubleshooting Memory

Memory (RAM) rusak, belum tentu PC tidak bisa beroperasi. Biasanya PC yang RAM nya rusak jalannya ga normal. Tanda-tanda RAM rusak yang paling sering :

1. komputer menyala, tetapi tidak mau booting (baik ada bunyi atau tidak dari speaker PC), solusinya coba pakai program untuk mendeteksi kerusakan ram, atau coba ganti dengan ram yang lain.
2. Blue Screen waktu nginstall sistem operasi. Kadang-kadang kesalahan baca file sistem operasi pada saat install.
3. “Crash” atau Blue Screen waktu jalanin program aplikasi.
4. komputer tiba-tiba restart sendiri.

Hal-hal yang dapat menyebabkan memory RAM rusak :

* Kurang daya dari power supply
* “Jam terbang” memory udah banyak
* cacat produk
* Human Error

Instal Windows XP Via Flashdisk


Fiuuuuh....akhirnya kelar juga percobaan buat bootable XP dalam Flashdisk. Awalnya coba googling dengan keyword "instal xp dari flashdisk", JRENG...JRENG...JRENG...banyaaaak banget!!! coba cari software buat jalaninnya, waaah...ada, gak nunggu lama langsung di download aja :D. Lalu aku coba ikuti petunjuk dari situs-situs yang aku buka tapi...kok malah error??? gagal deh... :(
coba lagi..gagal lagi, coba lagi gagal lagi...gemeeeeeessss.... :( Kira-kira apa yang salah ya??? kok selalu error pas buat virtual drive-nya???

Aku hanya berpikir, apa ada kesalahan dari applikasi yang aku download???mungkin iya kali. Aku coba googling kembali lalu kemudian dapat site ini. aku coba download filenya satu-satu, mulai dari bootsect, PeToUSB_3.0.0.7 dan usb_prep8. Lalu aku coba ikuti petunjuknya. Nih caranya:
1. Ekstrak semua hasil download tadi (bootsect, PeToUSB_3.0.0.7 dan usb_prep8) kedalam 1 folder, dan untuk mudahnya letakkan aja folder tersebut di DESKTOP dengan nama USB. Lalu copy file PeToUSB hasil ekstrakan tadi kedalam folder usb_prep8.
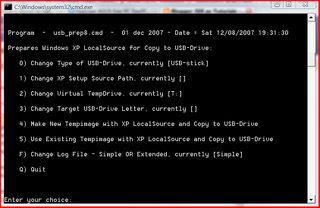
2. Buka folder usb_prep8 lalu double klik aja file yang namanya usb_prep8. Tar ada keluar Command Prompt kayak di gambar bawah ini.

3. Lalu Press any key to continue...tau artinya kan??? :D tekan aja sembarang tombol. Lalu akan keluar window kayak gambar dibawah ini.

4. Tidak ada setingan yang harus di ubah disini, hanya yakinkan diri aja dimana drive USB yang pengen di jadiin bootable XP itu kemudian cukup kamu klik START aja dan proses format Flashdisk kamu akan berjalan (ini akan merubah format flashdisk kamu menjadi FAT16).
5. Begitu pekerjaan format flashdisknya udah kelar jangan langsung ditutup window yang buat format flashdisk itu, tar malah gagal semuanya :D
6. Buka START---RUN---ketik CMD (kalau yang kamu pakai sekarang adalah windows XP) lalu setelah muncul window command prompt ketikkan aja "cd desktop" (tanpa tanda petik). Ketik lagi "cd bootsect" lalu "bootsect.exe /nt52 I:" (tanpa petik, kebetulan flashdisk ku ada di drive I, tinggal sesuaikan aja dimana drive flashdisk kamu). Perintah ini tujuannya adalah membuat boot sector yang benar ke dalam flahdisk kamu, supaya flahdisk kamu bisa menjadi bootable, tanpa ini semua nyapasti gak jalan :D
Oh iya ada yang perlu diingat nih, pada saat menjalankan perintah ini mohon di close aja window yang menampilkan isi dari flashdisk kamu. jika semua sudah selesai maka akan keluar kata-kata yang bunyinya "Bootcode was successfully updated on all targeted volumes." Sekarang di close aja window command prompt yang ini tapi jangan tutup window command prompt punyanya si usb_prep8. tar ada tampilan kayak gini nih:

Kalau belum tampil tinggal tekan ENTER aja.
7. Nah...sekarang tinggal ikutin perintah yang tampil itu. Dimulai dengan menekan angka "1" lalu ENTER, lalu kita disuruh nyari dimana lokasi dari windows kita (entah itu sudah di copy dalam harddisk atau masih dalam CD master XP-nya).
8. Tekan angka "2" lalu ketikkan drive yang gakada di dalam PC kamu, cth. "T", ENTER.
9. Tekan angka "3" lalu ketikkan drive dari flashdisk kamu (kalau aku kebetulan di drive "I").
10. Tekan angka "4" maka proses instalasi ke dalam flashdisk kamu akan dimulai, jika ada perintah untuk memformat drive "T" tadi ketik aja "Y" (yes) lalu ENTER lagi. selanjutnya kalau ada popup yang keluar klik aja "YES"
Finish!!!
Selesai deh...tinggal nanti kalau mau instal ke notebook atau PC yang mendukung boot lewat usb drive tinggal arahin aja first boot-nya ke flashdisk kamu ini :D
Sewaktu instalasi ke notebook atau PC, pilih dulu nomer "2" untuk text mode setup. Proses akan lanjut seperti instalasi XP biasa.
Setelah semua kelar pilih lagi nomer "1" untuk melanjutkan instalasi Windows XP.

Jangan dicabut dulu flashdisk kamu sampai proses dari instalasi windows Xp-nya selesai. Setelah selesai semua proses instalasi baru boleh cabut tuh flashdisk.
Thanks buat Mr. Fauzie atas do'a-nya...tapi di do'a in gak tadi ya?? :)) (guyon aja kok)... anyway..thanks :D
Mudah-mudahan sukses ya??? ;)

How To Install Windows XP


Udah lama gak posting nih...maaf...maaf ^:)^
Soalnya banyak banget kerjaan yang harus aku selesaikan, PR satu aja belum selesai2 ampe sekarang :(
Sebenarnya bingung juga mau posting apa, tapi setelah dipikir2 akhirnya aku putuskan aja posting cara instal Operating Windows XP :p
Kedengarannya udah basi bin kuno ya? :p tapi ya gak apa2 deh, itung2 siapa tau masih ada yang belum tau dan pengen belajar cara install Operating System Windows XP ini. Buat para pakar, spesialis and yang udah expert mohon maaf ya...dan tolong aku dan teman2 yang laen dibantu jika dalam postingan aku ini banyak yang salah ^:)^
Ok deh kita mulai aja ya?
Ada orang yang berpikir bahwa untuk instal windows XP kudu harus bin wajib punya CD Windows XP yang bootable, tanpa itu maka gak bisa kita install XP dalam computer kita. Sebetulnya tidak semua itu benar dan juga tidak semuanya salah...loh kok gitu?....ya iya lah, masa ya iya dong :p
Udah deh, tar aja jelasinnya...sambil jalan tar kita bahas.... ;)


Sekarang kita bahas buat instal melalui CD Windows Xp yang bootable.
Persiapan:

  1. Master CD Operating System Windows XP.
  2. CD/DVD Room.
  3. Yang jelas harus ada Computer nya juga dong, masa mau install XP gak ada Computer nya?
  4. Cemilan + minuman ringan
  5. Bakso semangkok sambelnya di banyakin ya? :D

Point yang kelima buat aku aja :D

OK, setelah semuanya lengkap kita mulai yuk...yuuuuuuk.....

  1. Masukkan Master CD XP tadi ke dalam CD/DVD Room.
  2. Rubahlah setingan di dalam BIOS supaya Computer booting awal (First Boot) melalui CD Computer kita. Masuk ke dalam setingan BIOS bisa dengan cara menekan DEL, F10, F9 etc. (tergantung Computer atau Notebook yang mau di instal)
  3. Nah...setelah itu ada tulisan tar yang muncul BOOT FROM CD... nah, jangan ampe habis tuh titik-titik langsung Pres any key aja. Kemudian instalasi windows mulai berjalan, gambarnya ada dibawah.
  4. Biarin aja semua berjalan.
  5. Kemudian akan muncul Blue Screen untuk memverifikasi tindakan yang akan kita lakukan kayak gambar dibawah, tekan aja ENTER.
  6. Muncul lagi Blue Screen End-User License Agreement kayak gambar dibawah, tekan aja F8 (I agree).
  7. Sekarang ada tampilan untuk mempartisi Harddisk yang kita punya seperti gambar dibawah, kalau computer kita sudah terbagi partisinya tinggal dipilih aja partisi yang mau di DELETE. HATI-HATI!!! jangan salah delete, salah delete maka data-data kita bakal hilang semua! Jika sudah yakin partisi mana yang akan di delete tekan D lalu ENTER lalu L.
  8. Setelah itu tekan aja C atau ENTER dibagian partisi yang akan di install Operating System Windows XP ini. Dan nanti ada pilihan bagaimana cara format partisi itu, apakah dengan cara fast or slowly. gambarnya ada di bawah.
  9. Setelah di pilih dan di tekan ENTER maka formating pun berjalan kayak gambar dibawah ini.
  10. Setelah formating selesai maka sekarang akan terjadi pengcopian files XP folders instalasi windows. Tuh gambarnya dibawah.
  11. Nah setelah pengcopian selesai maka computer akan restart dengan sendirinya.
  12. Jangan lupa untuk merubah kembali setingan BIOS yang awalnya first boot melalui CD sekarang dirubah menjadi first boot nya lewat Harddisk.
  13. Setelah di save setingan BIOS nya computer akan restart dan akan ada tampilan seperti dibawah ini.
  14. Lalu instalasi windows terjadi.
  15. Kemudian muncul window seperti gambar dibawah, tinggal kita atur saja mau setingannya gimana. Kalau gak mau or males ngaturnya tinggal Next aja.
  16. Isilah kotak yang disediakan, NAME isi aja nama kamu, lalu ORGANIZATION isi aja nama aku :p
  17. Nah setelah next nya di tekan, kamu disuruh buat ngisi Product Key dari windows yang kamu pake sekarang.
  18. Setelah next kerjaan kita belum selesai, kita masih disuruh ngisi Computer Name, isi saja dengan nama ku :p untuk password sebaiknya jangan di isi, takutnya kita lupa, kalau mau di isi juga gak apa-apa kok. Lalu pilih Next.
  19. Seting tanggal dan jam, sesuaikan dengan tanggal dan jam kita instalasi aja. Time Zone pilih saja yang Bangkok, Hanoi, Jakarta. Lalau Next lagi.
  20. Biarkan semua jalan sendiri. Jika ada pilihan Network setting, kamu pilih aja yang typical lalu Next. dan jika ada window satu lagi muncul di Next aja, gak usah pusing-pusing :D
  21. Nah sekarang tinggal tunggu instalasi windows XP nya kelar.
  22. Setelah semua selesai ada tampilan window seperti gambar dibawah, ini di OK kan aja.
  23. Lalu muncul lagi window baru, OK kan aja lagi.
  24. Nih tampilan setelah semua di OK kan.
  25. Hampir selesai nih instal XP nya :)
  26. Kalau ada tampilan kayak gambar dibawah itu Next kan aja.
  27. Kalau ada lagi tampilan window kayak gambar dibawah pilih aja SKIP.
  28. Lalu pilih "No, not at this time"
  29. Isi Box "Your Name" dengan nama apa terserah, tapi sebaiknya setelah aku pikir-pikir pake nama aku lebih bagus kali ya? :p lalu pilih Next.
  30. Dan yang terakhir adalah FINISH.
  31. Sudah selesai instal Windows XP nya. Mudahkan?? :p


Oh iya lupa...itu kan lewat CD master bootable nya Windows XP ya??? Nah...kalau lewat bootable disket windows 98/SE atau cd bootable windows 98/SE gini:
  1. Awalnya tetap sama...first boot arahkan ke cd room.
  2. Lalu kita pilih with cdroom support.
  3. Arahkan dimana lokasi master XP yang kamu simpan. misalnya lokasinya ada di drive D dan masternya ada di folder XP, tinggal kamu ketik ada D: lalu CD XP
  4. Lalu ketik kembali CD i386
  5. Ketik lagi WINNT
  6. Selesai...proses pengkopian data dimulai dan setelah selesai dan computer restart kamu tinggal ikuti instak xp seperti yang ada di bagian paling atas ;)

Semoga berguna and Good Luck ;)
BTW...Kalau ada yang belum punya Windows XP nya bisa di ambil dari SINI YA? :)

P


Design by infinityskins.blogspot.com 2007-2008